Creating
Hand Painted Textures
|
Hello again :) I just wanted to say thank you if you've been following my posts! To recap: We've followed along with Tyson Murphy through his stylized texturing with only using Photoshop, and we've also tried Fanny Vergne's method using Substance Painter then migrating that over to Photoshop! Both can create really really beautiful textures that vary in looks, and they're both really fun to play around with! I've learned a lot from trying out only these two methods and I also know what I need to improve on and look more into! This beginning journey through stylized texturing is going to really help with my Capstone texturing and I can't wait to learn more to create better and better textures with every bit of practice. 
0 Comments
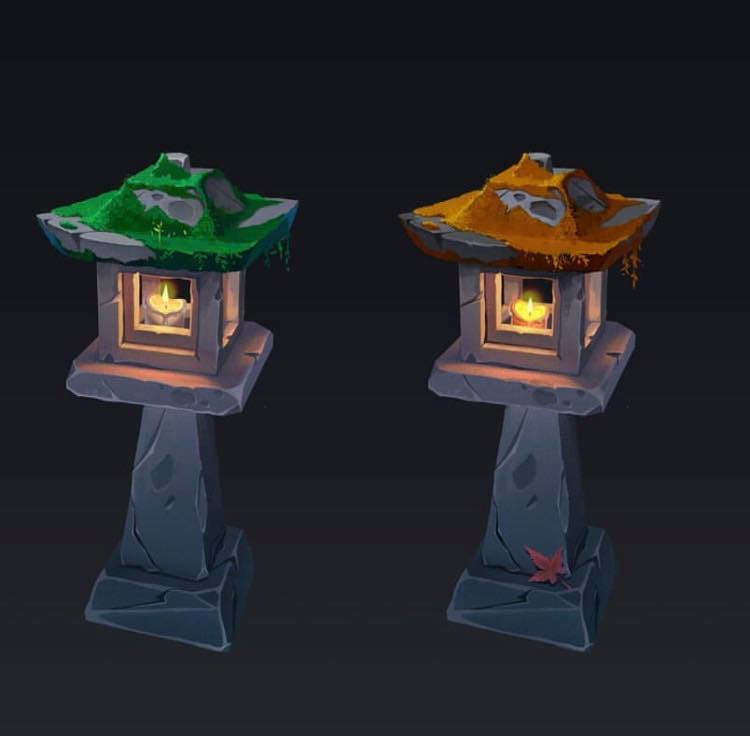
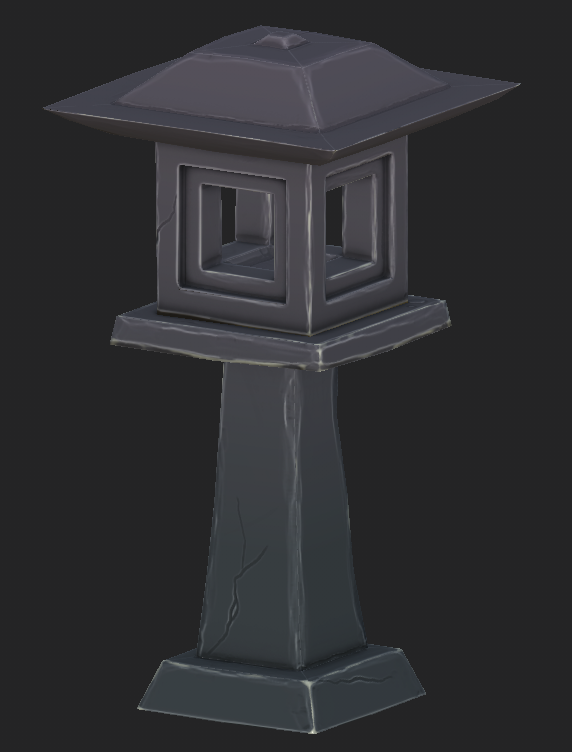
A couple of months ago I stumbled across this picture that was posted on Stylized Station's Instagram and I thought it was really nice for a pretty simple 2D prop. I thought it would be fun to create a 3D version and practice hand painting, so I went ahead and modeled a low poly version of the prop in Maya, then planned on texturing it but never did. After looking into a couple of methods to hand painted texturing and also rediscovering this screenshot in my phone pictures, I'm going to attempt to put what I now know into finishing this model! To start I needed to open up the low poly model I made a while ago to see if I had UV unwrapped it, and if so, if they were laid out well enough to be able to texture they way I want to. To my surprise, I had already UV'd the prop! (Usually I just model then leave the UVs for future Taylor to hate herself.) The only thing I had to change was the way they were arranged. I knew going into this that I wanted each side to be unique with no reusing space (not usually ideal for hand painting textures,) so I used a quick layout option to automatically take what I had and put it neatly on the sheet. Next I brought my model into ZBrush for some quick and fun stylized sculpting! When I sculpt I mainly use Orb's brush pack. For the purpose of this little project, I only really added a bevel to all of the edges since the main goal is to texture the prop. After finishing my quick sculpt, I then brought my low and high poly into Substance Painter, baked my maps, then took Fanny's approach from the second method in one of my previous blog posts. I've tried in the past to create stylized textures in Substance Painter, but I've never been successful - always just sad and frustrated. Fanny has made me want to try again after how amazing her sword looked and listening to her explain her process.
Once I was happy with what that layer was looking like, I added another layer similar to this, but only for some brighter highlights on the edges in some places, then I added a layer for AO. This is where I was happy to export my textures and bring them into Photoshop for further editing. The first thing I did was make the overall image more saturated and lighter to look a tiny bit more lively and not so gray. Then I added more scratches and dents with highlights. Below before and after my Photoshop texture pass. I'm pretty happy with the way the final prop looks in comparison to my other attempts on different models in the past, and of course in comparison to the concept art! :) If I were to change anything at this point, the first thing I would change is to add in the lit candle to the center. I think the added light source would be fun to incorporate into the texture. The second thing I would change is that the lighting is still pretty flat! I didn't notice this until the very end, but other than the gradient or highlights to the edges, there's really not a whole lot of light shown on the texture! Some artists don't add in light to their textures when doing stylized PBR; in all honestly I planned for it then forgot about it as I went on thinking about details and highlight angles, oops! Let's pretend I meant for that to happen. The third and final thing that comes to mind when I think about changing this prop, would be adding in the moss on top like the concept art shows. I really enjoyed creating this, and how Fanny's method is built on the method that Tyson uses. Going into this I thought Fanny only used Substance Painter, but it only started out that way and you still get the fun of hand painting instead of mainly relying on filters and generators. I think for now I've looked into enough and it's time to actually do something. I've decided I'm going to have a go at Tyson Murphy's sword texturing first. The image below is what I had after a couple tries to make believable lighting. This was actually kind of difficult to achieve, believe it or not; imagining where the light would be hitting the sword and painting that detail on. It's a lot easier to say "okay the light will be hitting these faces like this, and the light will start to falloff here," rather than actually doing it. 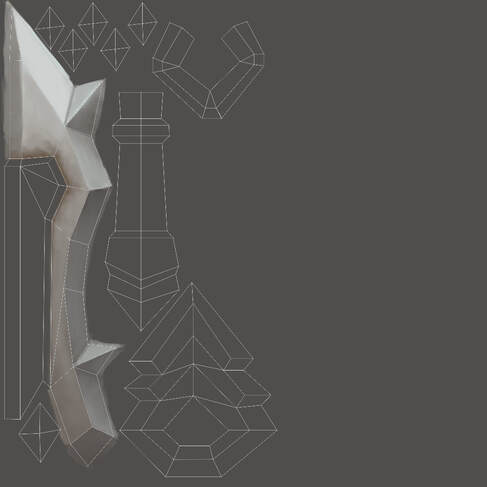 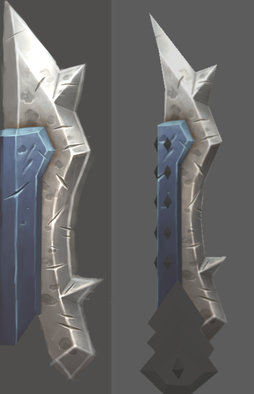 This is what I ended up with after following the first couple of videos of texturing the sword.
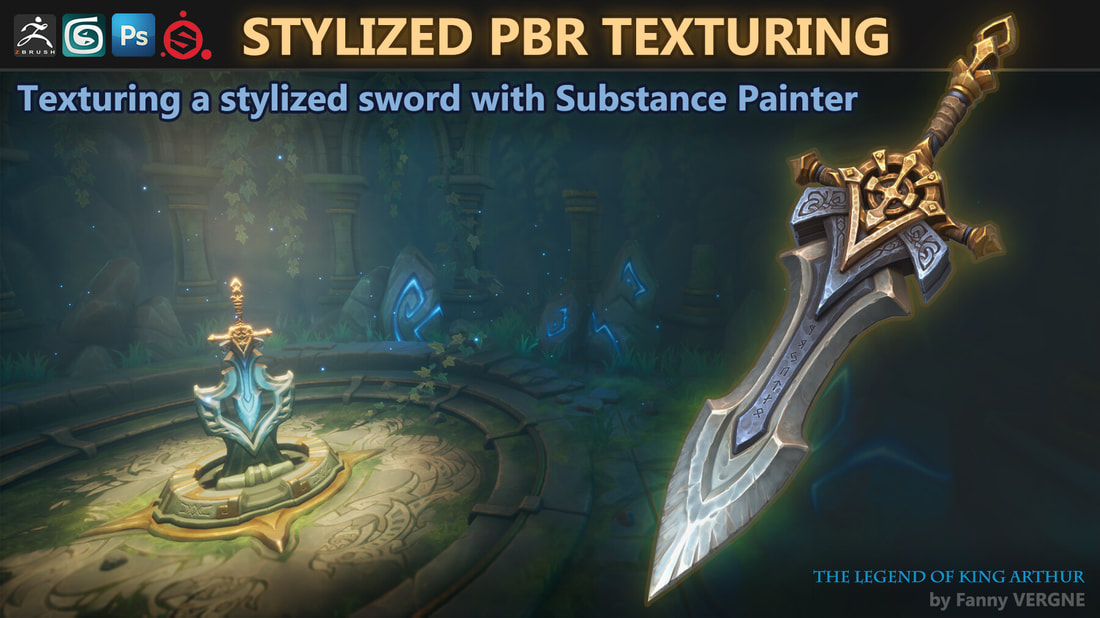
I think for a first attempt at hand painted texturing, this is a solid start. Of course there's a lot of room for improvement and I think if I gave myself more time, this could have been even better. I wasn't planning on following the entire tutorial, seeing as how I want to do a couple different methods of texturing, so I cut it off at the beginning of the blue metal around the blade. Also, I spent too much time on tiny details, overthought it, then made myself frustrated with everything I was doing and redoing them. I'm definitely going to have to learn to not do these things, otherwise I'm never going to be able to get my Capstone finished. A couple of the main things that I pulled away from this tutorial: 1. Just paint. Don't overthink starting or all the details and their placements and whatnot, just do it. 2. It's so easy to get carried away, if you find yourself working on one area for a long time, just move on to the next part, it's probably fine and if it's not, come back to it later. 3. Gradients are extremely useful. From making/keeping a focal point, to demonstrating light fall off. 4. Colour is kind of difficult! Learn some colour theory!! Tyson uses so many colours, even though it doesn't look like it at a glance. Sometimes he'll go from let's say a purple to a blue, but other times he'll just jump from purple to green to yellow and it'll look great. When I try it, it looks very forced and like it doesn't really work. I follow a large amount of artists that specialize in the hand painted style, and recently one, Fanny Vergne, a former Senior Artist at Blizzard, released her process on Stylized PBR Texturing after completing the ArtStation King Arthur Challenge! Starting Off In the start of the video, Fanny shows that she first has her sword mesh separated into different pieces for easier isolation in ZBrush. She then further separates it by adding one material for each of the different materials and pieces of the sword (Gold for the Hilde, Dark Brown for Leather, Light Blue for the Blade, Dark Blue for the Grey Metal,) then going under the Render tab in Maya, then Render to Texture to create an ID map. Having that ID map is useful for more easily creating a folder for each intended material and using colour selection to help mask it out in Substance Painter. In Substance Painter, she has four main folders: Gold, Leather, Grey Metal, and Blade. In each of these main folders, there are two subfolders: Albedo and Metal. Albedo is the folder to affect purely the base colour and the Metal is the folder for only affecting the metallic and roughness. Going into the Albedo folder of the Blade, Fanny shows that she started to create the blade texture in Substance Painter, then once she was happy, exported the texture and moved it into Photoshop to really amp up the look and feel of the blade.
My love for this style has been around for quite a while, so in December of last year, I decided to purchase a tutorial called Learn the "Hand-Painted" Texturing Style for Video Games by Tyson Murphy on Udemy. Even though I bought this almost a year ago now, I've never actually gone through it, and now is a perfect time.  In this tutorial, Tyson takes us through his process on modeling and creating hand painted textures for a sword and shield based off of concept art, using Maya and taking the model UVs into Photoshop to paint the textures on. For my Proof of Tech, since I'm only focusing on how to create the textures and not modeling, I'm just jumping right to the part where Tyson starts texturing the sword. Getting Ready Tyson starts by taking a snapshot of his UVs and bringing them into Photoshop. Using those UVs he creates a mask for easy Island selection and painting, and always has the mask selected but hidden on it's own non-visible layer. He then creates a new layer and fills the mask with the brown/grey he chooses for the base layer of his sword, saves it and loads the PSD file onto his model in Maya with no lighting so he can see what he's doing, as well as looking at the model to visualize where lights would be and how it would hit the model and show as a texture. The texture size should be larger than you're going to have it on the model, so you can add in details and everything, then you can shrink it down to the correct size and sharpen the image. Tyson creates the texture on a 1024x1024 canvas then when it's finished he scales it down to 512x512 and sharpens the image. Starting to Paint
The Details
Final Touches
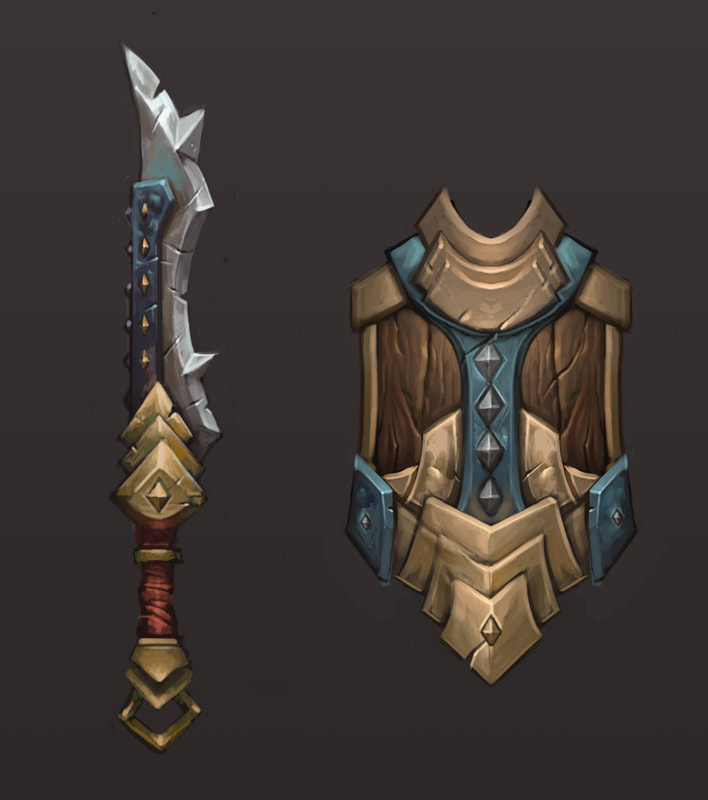
The Finished Look 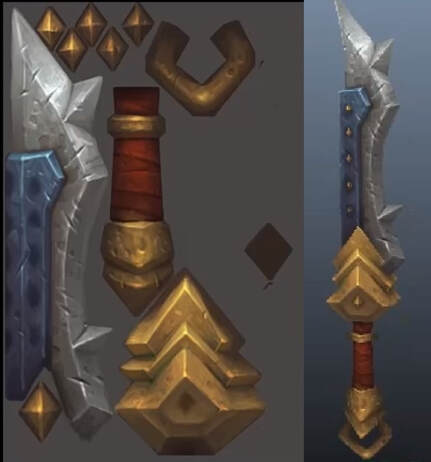 After listening through Tyson Murphy explaining and showing off his process for making these materials, there's a lot of helpful information to take away for this method of texturing. Welcome to my Dev Diary! Throughout the next little bit, I will be looking into how to create hand painted textures through a couple different artists' methods, to increase my knowledge and understanding so I can better create them myself. The end goal is to be able to create believable hand painted textures, so that I will be better equipped to tackle bringing the concept piece below to life. |
AuthorHey there, my name is Taylor Gillett and this is my journey through better understanding and creating hand painted textures! ArchivesCategories |
 RSS Feed
